While marble tile installations can be put in using a grout-free design, the standard procedure requires grout to be put in the joints between tiles. This is the case for artificial tiles, such as natural stones like marble. The details and the type of grout vary based on the kind of marble you’re working with. However the general procedure for installation consisting of “fill the joints and clean the surface” applies to all types of marble. Understanding how to grout marble guarantees that you do not damage the stone and will extend the installation’s lifespan. You can get grout cleaning services from anywhere in the world.
Polished Marble
Grout polished marble with a tightly joined joint (up to 1/8 inches) with grout that is not sanded because sanded grout can scratch the marble’s surface. Put the grout in the grout joints by using the edge of the grout floating. Clean up any excess using an edge on the floating.
The grout should be cleaned 20-30 minutes after filling or after grout lines become hard and dry. Fill an empty bucket with cold water, and then dampen your sponge. Smooth the surface using the sponge. Clean the grout using a diagonal wipe across joints and the tile.
Another 15 to 30 minutes before examining the grout line for any hollow areas. Because there is no sand in the grout that is not sanded, it can shrink as it cures if the joint was not pushed enough into the joint, leaving a depression. You can apply more grout to these areas if you spot these.
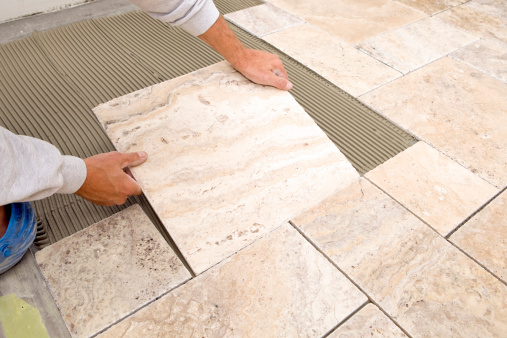
Natural Tumbled Marble
Fill in grout joints on natural marble with joints greater than 1/8 inches using a sanded grout. Apply the grout in the same manner by putting the float on the edge of the float. Allow the grout to set before cleaning it with water and a sponge.
The edges of the perimeter of tiles using masking tape on the grout joints if you’re working with natural marble that has imperfections and holes you wish to avoid. The tape prevents you from smearing too much as you fill the joints and clean the grout lines.
Spread grout over the entire surface if you wish to fill in the gaps and gaps in marble tumbled with grout. Don’t let yourself go over 20 mins before cleaning, or you’ll have an issue getting rid of the grout since marble is porous and soaks up water that has been drained off the grout.
The choice of grout and glue to use for marble tiles
Marble is a hard and compact but delicate natural stone that can be utilized to give a space an elegant feel or to create a unique ambiance. It is typically used for the floor or wall tile. In this post, we’ll be going over the requirements of marble tiles and how to identify the ideal adhesive and grout for the marble tile.
Marble tiles require special attention
Marble is a metamorphic rock created due to the formation of limestone by extreme temperatures. The tiles can be identified due to their distinctive vein-like texture: plates or sheets made of crystallized minerals. Since it is a natural stone, installing marble tiles requires a particular focus on several aspects: Marble tiles are available in a variety of colors.
Possibilities:
Since marble has been created at high temperatures, it is a solid and dense structure with an extremely smooth and porous surface. Because of its non-porosity, there are many possibilities for grout and blue marble tiles.
Motion:
Even though marble tiles aren’t very porous, they may expand when exposed to high temperatures or fluctuations in temperature like floor heating or extreme humidity, as in bathrooms. The possibility of expansion or movement of the tiles needs to be considered when selecting the grout or glue to be used for marble. One should choose a flexible grout and glue to avoid the tiles from breaking.
Colour:
Marble marble comes in many colors, but the white and black shades are the most sought-after within the US and Canada. When it comes to choosing grout and glue to use with marble tile, remember that the hue of the tile defines some limitations. White and other tiles with light colors should be given an adhesive that is white to stop the darker shade from shining in and diminishing the look of the tile. The selection of grout impacts the appearance of the tile. The grout may match the tile’s color, or it can be contrasting.
Grouting marble tiling
After the marble tiles are placed in their position using adhesive, it’s an ideal time for grouting the edges to fill and seal them. Before grouting, tiles must be rinsed and then sealed to provide an extra layer of protection on the tiles. The sealer does not just protect tiles from grout but also protects them from staining and dirt.
There are two kinds of natural stone grout and further broken down into various subtype. Both epoxy and cementitious grouts are suitable for marble but with some cautions. Cementitious grout is the most popular choice for natural stone. It comes in sanded, non-sanded, and modified latex variants. The latter is more flexible than the other. A non-sanded grout is much more popular than sanded because marble tiles typically have thin seams. If you are tiling with large seams and choose to use sanded grout, be mindful that the sand used in the grout could damage the tile’s surface.
Read more: How to clean bathroom tiles-3 minute guide